 Save
Save These delightful heart-shaped sugar cookies begin with a rich, buttery dough, featuring flour, baking powder, salt, unsalted butter, sugar, egg, and vanilla extract. The dough is mixed, chilled for at least an hour, then rolled and cut into charming heart shapes. Baked until lightly golden, they are then cooled. The cookies are completed with a sweet, smooth icing made from powdered sugar, milk, corn syrup, and vanilla, which can be tinted with food coloring. This classic treat is perfect for festive occasions or a thoughtful homemade gift, offering a soft texture and delicious vanilla flavor.
There's a particular kind of joy that bubbles up when the house fills with the sweet, buttery scent of baking sugar cookies. I vividly remember one winter afternoon, snow falling softly outside, when I decided to bake a batch for no grand occasion, just for the sheer warmth of it. The kitchen became a cozy sanctuary, filled with the hum of the mixer and the promise of something delicious. It was a simple act, but it instantly lifted my spirits and reminded me of the comfort baking brings.
I once made these heart-shaped cookies for a small, impromptu Valentine's Day gathering with friends who were feeling a little down. I spent hours meticulously piping tiny white details onto pink and red hearts, a labor of love accompanied by my favorite upbeat playlist. Seeing their faces light up as they bit into the tender, sweet cookies, and the way everyone started swapping their favorites, made all the effort feel absolutely worth it. It transformed a regular evening into something truly special.
Ingredients
- All-purpose flour: This is the backbone of your cookies, providing structure; make sure to measure it accurately for the best texture.
- Baking powder: Gives a gentle lift, ensuring your cookies aren't too dense but still hold their shape beautifully.
- Salt: A crucial flavor enhancer, it balances the sweetness and brings out the buttery notes in the dough.
- Unsalted butter, room temperature: Key for a tender crumb and rich flavor; it creams beautifully with sugar when soft, incorporating air.
- Granulated sugar: Provides sweetness and helps create that signature crisp-chewy texture in the cookies.
- Large egg: Acts as a binder, adding richness and helping the dough hold together.
- Pure vanilla extract: Absolutely essential for that classic, comforting sugar cookie flavor; avoid imitation for the best results.
- Powdered sugar, sifted: Creates a silky smooth icing with no lumps, which is vital for easy decorating.
- Milk: The liquid base for your icing; adjust the amount slowly to achieve the perfect consistency.
- Light corn syrup: Don't skip this; it adds a beautiful gloss to your icing and helps prevent it from cracking.
- Food coloring (gel or liquid), as desired: Allows for endless creativity and vibrant cookie designs.
Instructions
- Gather Your Dry Ingredients:
- Grab a medium bowl and a whisk, let's get our flour, baking powder, and salt mingling together. Set this mixture aside for now.
- Cream Butter and Sugar:
- In a large bowl, using an electric mixer, beat the room temperature butter and granulated sugar until the mixture becomes light and wonderfully fluffy, usually about 2-3 minutes.
- Add Wet Elements:
- Crack in that large egg, splash in the pure vanilla extract, and beat until they're just combined, scraping down the sides of the bowl as needed.
- Form the Dough:
- Gradually add the reserved dry ingredients to the wet mixture, mixing on low speed until a soft, pliable dough comes together. Be careful not to overmix.
- Chill the Dough:
- Divide the dough in half, gently flatten each portion into a disc, wrap them snugly in plastic wrap, and send them off to the fridge for at least 1 hour to firm up.
- Prepare for Baking:
- While our dough rests, let's get the oven toasty to 350°F (175°C) and line your baking sheets with parchment paper.
- Roll and Cut:
- On a lightly floured surface, roll out one disc of chilled dough to an even 1/4-inch (6 mm) thickness. Now, let the heart-shaped magic begin with your cookie cutter.
- Bake to Perfection:
- Carefully place your lovely heart cutouts about 1 inch (2.5 cm) apart on the prepared baking sheets.
- Cool Completely:
- Bake for 8-10 minutes, or until their edges are just a delicate golden brown. Let them firm up on the sheets for 5 minutes before transferring to a wire rack to cool completely.
- Whip Up the Icing:
- For the icing, whisk together the sifted powdered sugar with milk, light corn syrup, and vanilla extract until it's beautifully smooth. Adjust consistency with tiny splashes of milk if needed.
- Color Your Icing:
- Divide your pristine white icing among several small bowls and let your artistic side shine with various food colorings, mixing until you achieve your desired shades.
- Decorate and Set:
- Now for the grand finale – pipe, spread, or drizzle your colorful icing onto the completely cooled cookies. Allow the icing to set fully before serving or packaging.
 Save
Save I remember one blustery Saturday morning when my niece, still a tiny whirlwind of energy, burst into my kitchen, declaring her intention to make "rainbow heart cookies." We spent hours, flour dusting every surface and every giggle echoing through the house. Her decorations were, shall we say, abstract — more blotches of color than precise lines — but the pure, unadulterated joy on her face as she proudly presented her creations was priceless. Those imperfect cookies tasted like pure love and laughter.
Crafting Your Perfect Cookie Dough
Getting the dough right is half the battle, and it's surprisingly forgiving once you know a few tricks. Ensure your butter is truly at room temperature – soft enough to indent easily, but not melted. This allows it to cream beautifully with the sugar, incorporating air for a tender crumb. Remember, stop mixing just as the flour disappears to prevent gluten development, which can lead to tough cookies.
Mastering That Silky Icing
The secret to a beautifully smooth and manageable icing lies in its consistency, which you can easily adjust with tiny splashes of milk. For outlining, you want it thick enough to hold its shape, almost like toothpaste. If you're planning to flood the cookies, thin it out slightly so it flows smoothly but doesn't run off the edges. The corn syrup isn't just for shine; it also adds elasticity, preventing the icing from cracking as it dries.
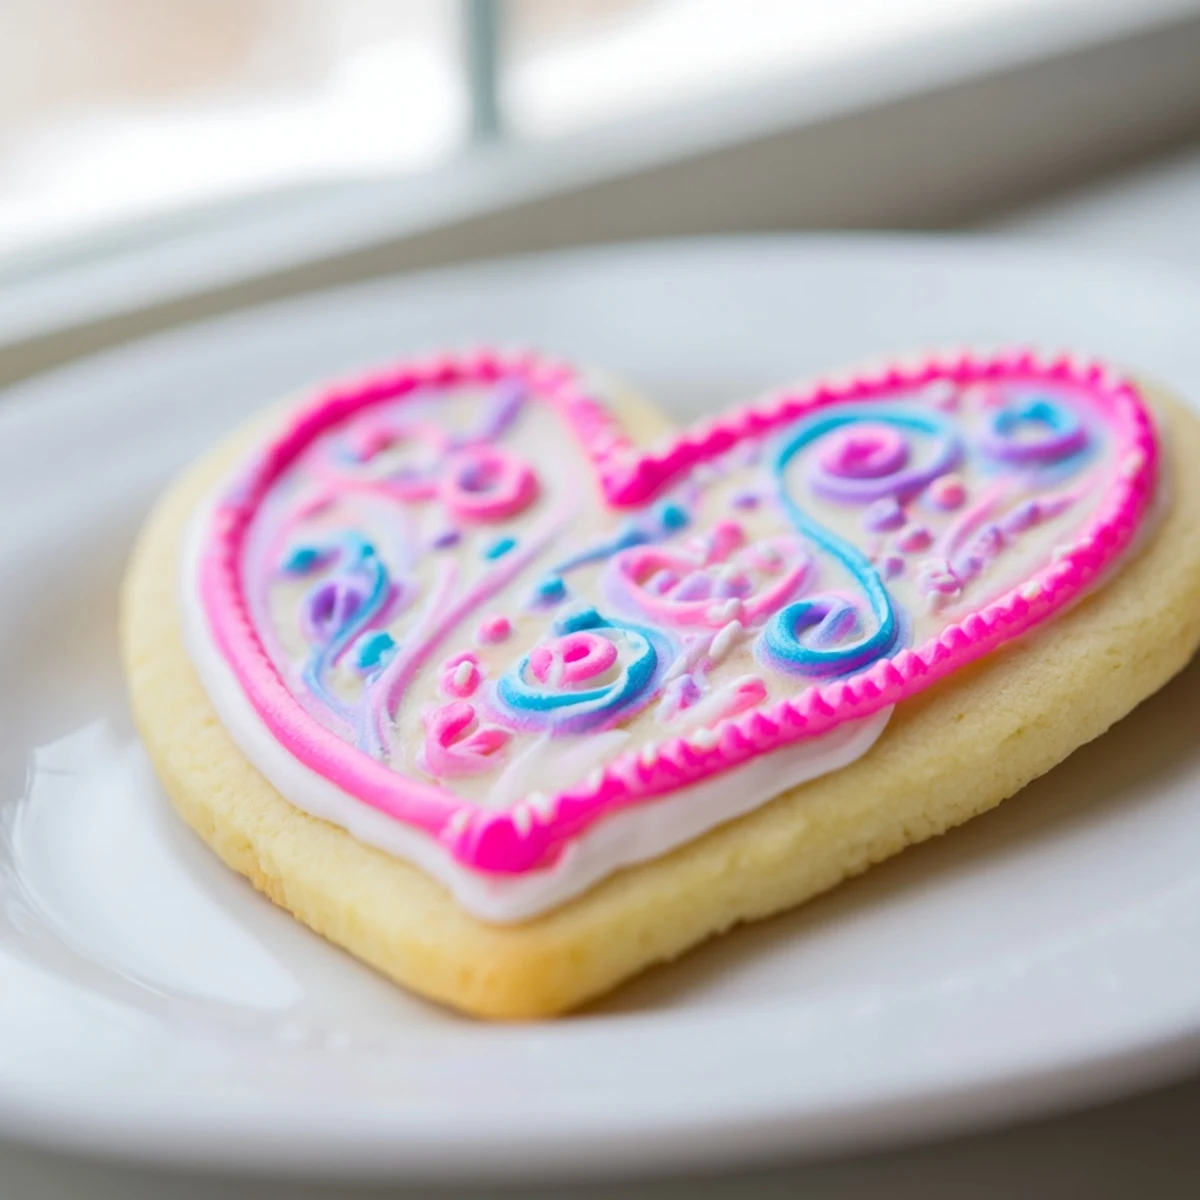
Unleashing Your Inner Cookie Artist
Decorating these cookies is where the real fun begins, a blank canvas awaiting your edible masterpieces. Don't feel intimidated; even simple designs look charming when done with love. Think about themes for holidays or special events, choosing colors and sprinkles that match the mood.
- For intricate details, use a fine piping tip or a squeeze bottle with a small opening for better control.
- Experiment with wet-on-wet techniques by dropping a different color of icing onto still-wet base icing and dragging a toothpick through it for swirls.
- Before the icing sets, consider adding a sprinkle of edible glitter or some festive sprinkles for extra sparkle and texture.
 Save
Save Baking these heart-shaped sugar cookies is more than just following a recipe; it's about creating edible moments of joy and sharing a little piece of your heart. So go on, bake a batch, and spread some sweetness around.
Recipe Questions & Answers
- → How long do these heart-shaped cookies stay fresh?
-
When stored in an airtight container at room temperature, these delightful cookies will remain fresh for up to one week.
- → Can I prepare the cookie dough in advance?
-
Absolutely! The dough can be made ahead and kept refrigerated, well-wrapped, for up to 2-3 days. This allows you to bake fresh cookies whenever you're ready.
- → What's the secret to crispier sugar cookies?
-
If you prefer a crispier texture, simply extend the baking time by an additional 1-2 minutes. Keep a close eye on them to prevent over-browning.
- → How can I add different flavors to the cookies?
-
You can easily customize the flavor! Try adding a different extract, like almond, instead of vanilla. For a zesty twist, incorporate 1 teaspoon of fresh lemon or orange zest into the cookie dough.
- → Are there any tips for decorating the cookies with icing?
-
Ensure your cookies are completely cool before applying the icing. You can use a piping bag with a fine tip for detailed work or a spoon for a simpler flood. Don't forget to add sprinkles or edible glitter while the icing is still wet!
